


Pin itHacks are my weakness – I absolutely love to find tricks to doing something that makes it easier. This collection of 80 sewing hacks is sure to make your life much easier. There’s just something about the joy and satisfaction you get from creating something. I love sewing my own clothing, home decor, and well, just about anything! If you love sewing, too, even if you just do it for repairs from time to time, these hacks are going to make your life so much easier!
From how to keep your sewing scissors super sharp to perfectly installing a zipper, there’s something in here to handle every single sewing situation you can imagine. And the list is perfect for all sewers from newbies to seasoned crafters.
I know you’re going to find something in here that will make your sewing time easier. This list is filled with sewing hacks that you’ll wish you knew sooner. I can’t wait for you to begin trying some of these tricks and tips!
1. How To Keep Scissors Sharp
You can’t really sew well if your scissors are dull. I mean, you could sew but you’ll also need to be able to cut thread and fabric, right? Keeping scissors sharp isn’t difficult and it doesn’t take much time, but it is essential for sewing. A good way to keep scissors from dulling is to ensure that you only cut fabric with them. Avoid cutting pins and always keep them clean and dry.
Source and more info: andreasnotebook
2. Double Needle Thread Hack
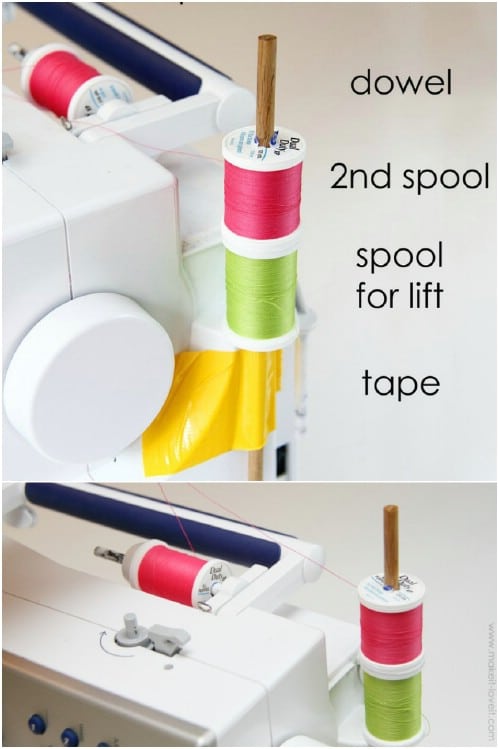
I don’t have a lot of experience with a double needle. If you do, you probably know how great they can be when it comes to making double stitches. For those of you like me who don’t really know much about double needles, you can easily learn to use them, and there’s a great hack for using a dowel rod to replace the second spool holder, as well as one for keeping thread from tangling.
Source and more info: makeit-loveit
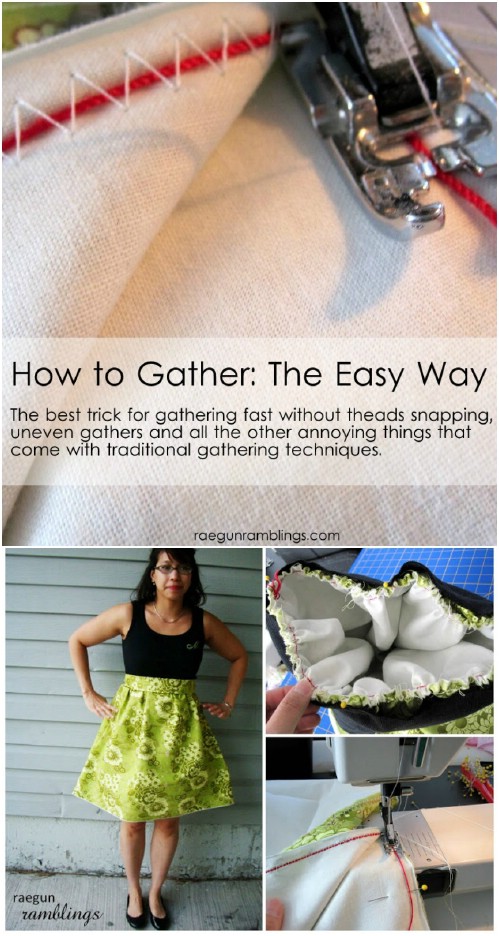
3. Easily Gather Fabric
Gathering fabric to make those wonderfully full skirts can be difficult. If you’ve ever done it, you know how frustrating it can be to keep the fabric in line and get a great ruffle at the same time. You can use crochet thread to help get the perfect gather every time. If you’re using a machine, the zig zag stitch is great for gathers, and it makes it so much easier to ensure a uniform gather throughout.
Source and more info: raegunramblings
4. Pinning A Button Hole
If you’ve ever sewn a button hole, you know the frustrations of getting to the end of your project and seeing that you’ve sewn that hole right up. A great way to avoid this is to pin the button hole. Just slide a pin across the end of the hole so that you’ll see it when you get close. This way, you can get on with sewing as fast as you want without worries of having to cut the hole open when you’re finished.
Source and more info: simplesimonandco
5. Serger Thread Hack
If you have a serger, then you likely know how expensive it can get to purchase thread cones, especially when you need four cones of each color for every project. There’s a great hack for this that will save you loads of money. You will need one cone of serger thread in the color that your project requires, as well as empty thread spools and an empty bobbin.
Source and more info: moonthirty
6. Learn Stay Stitching
Stay stitching is a sewing must, especially when working with certain fabrics. This is a hack in itself, where you sew a row of stitches onto fabric to help it maintain its shape. It’s a great technique for curved edges or anytime you have an edge that may stretch out while you’re sewing. You can also use it on folds of fabric, like tucks, to keep them in place when you’re attaching other pieces. This is definitely a technique that you’ll want to learn.
Source and more info: tillyandthebuttons
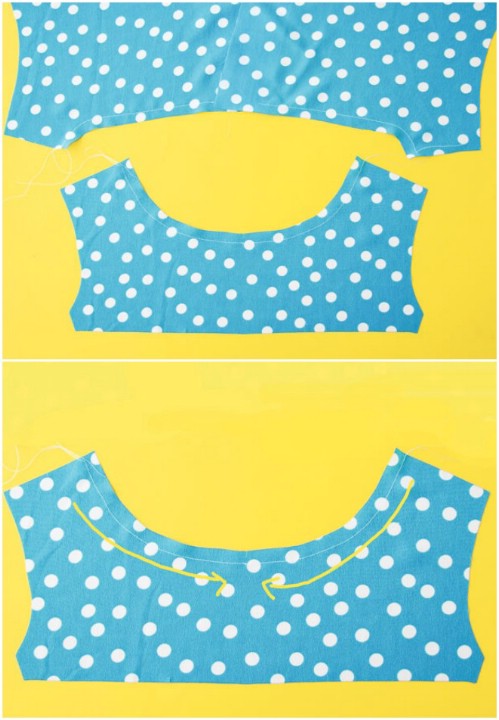
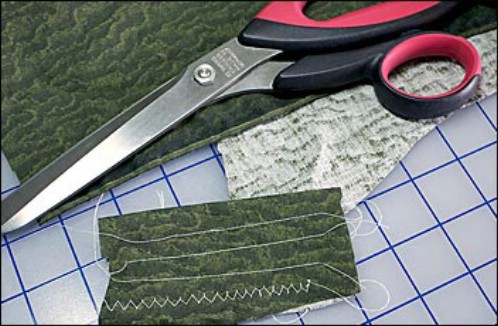
7. Finish Seams Without A Serger
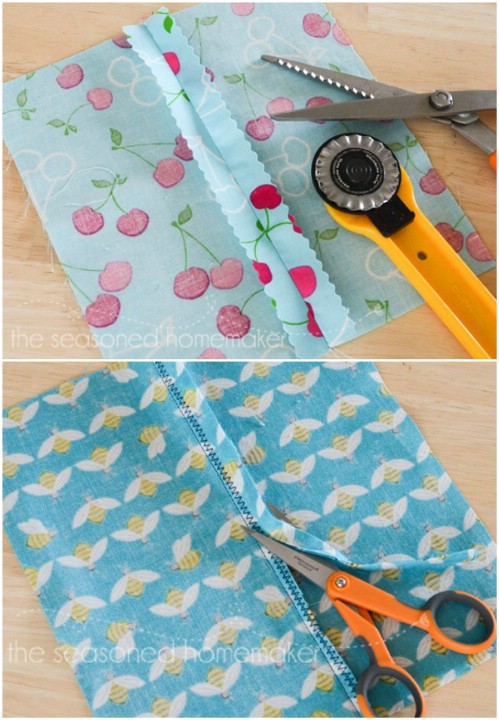
I’ve always wanted a serger but unfortunately, these are not cheap machines. I love the seams that are done on sergers. They’re so neat and strong. If you don’t have a serger, you can still get those amazing seams with just a little trick that I’ve picked up. Learning these great seam finishing techniques will help you to sew those seams like a pro, without the expensive pro equipment.
Source and more info: seasonedhomemaker
8. Finishing The Top Of Zippers
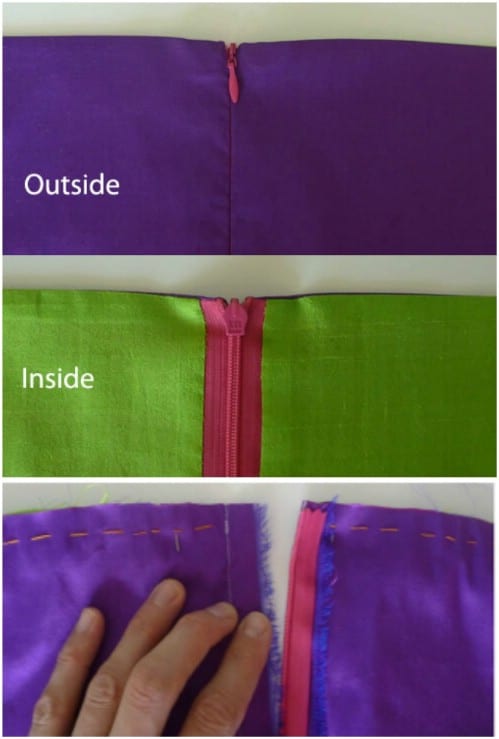
Putting in a zipper is one thing but finishing off the top of your zip is something else entirely. It’s so difficult to get that perfect “professionally done” look when you’re working with zippers. There’s a great sewing technique that you can use that will ensure you get the perfect looking zipper top every time, and it’s not at all difficult even for beginners. If you’re making clothing, this is definitely a technique that you’ll want to learn.
Source and more info: burdastyle
9. How To Organize Sewing Pins
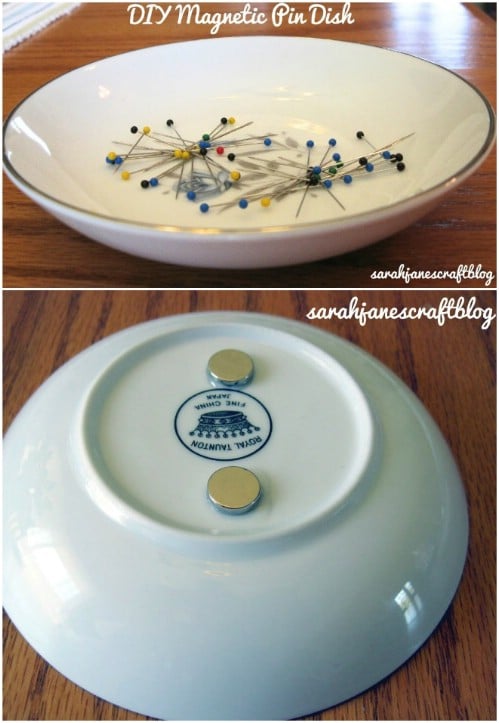
Keeping your pins organized is essential in efficient sewing. You don’t want to have them falling all over the floor – that can be very painful when you’re barefoot. A great trick to keeping pins together is to hot glue magnets onto the bottom of a shallow bowl or saucer. The magnets will keep your pins neatly in the dish and you can get on with your sewing.
Source and more info: sarahjanescraftblog
10. Preventing Thread Tangles When Hand Sewing
Even if you use a machine for most of your sewing, there are going to be times when you’ll need to turn to the traditional way of hand sewing. When that happens, it almost never fails that thread becomes tangled. One great way to keep that from happening is to coat your thread with beeswax. It won’t change the thread at all and it will make it much easier, not to mention faster, to get that sewing done. This little trick also strengthens thread so it won’t break easily when you’re sewing.
Source and more info: sew4home
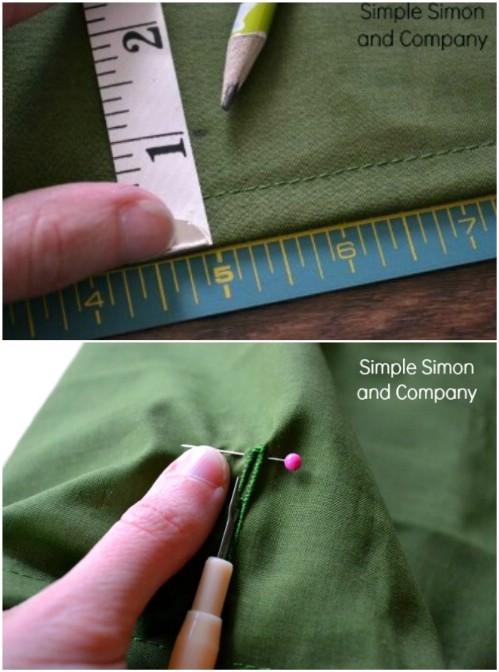
11. Quick Hack To Mark Seam Allowance
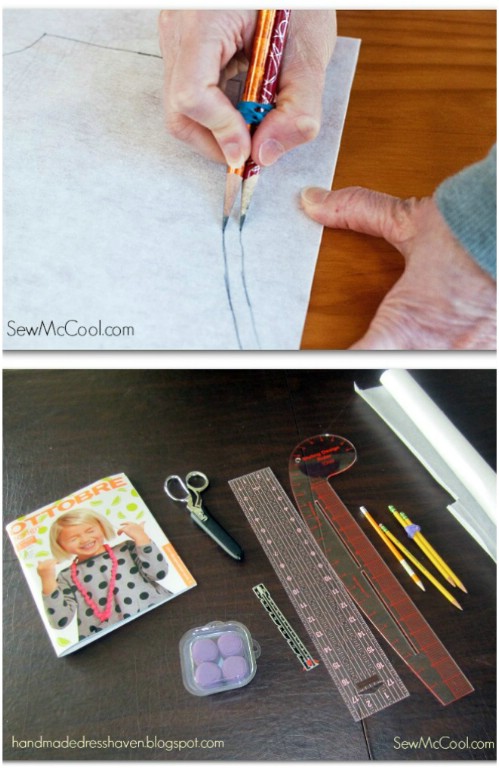
Many patterns don’t include the seam allowance, so you’ll have to add it yourself. There’s an easy way to do this which ensures that the seam is uniform throughout. Use a rubber band to hold three pencils together. This gives you the right amount of space between each line and lets you draw the line pattern and the seam allowance line at the same time.
Source and more info: sewmccool
12. Stitching Perfect Quilt Lines
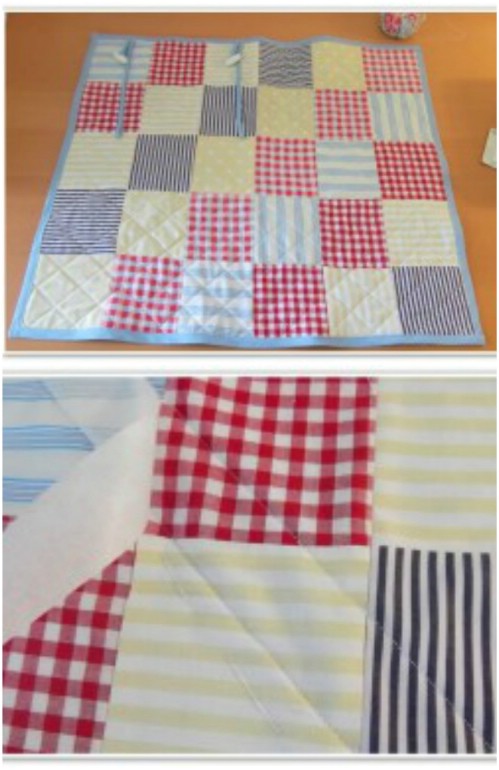
Quilting really is a lost art. If you can quilt, kudos! I love handmade anything, especially quilts but it can be so difficult to ensure that all of those lines stay straight when you’re working with so many smaller squares of fabric. There’s a hack for that, too. Use masking tape to mark off your edges. The tape keeps those little squares from moving so that you have perfect lines in every stitch.
Source and more info: makery
13. How To Easily Sew Circles
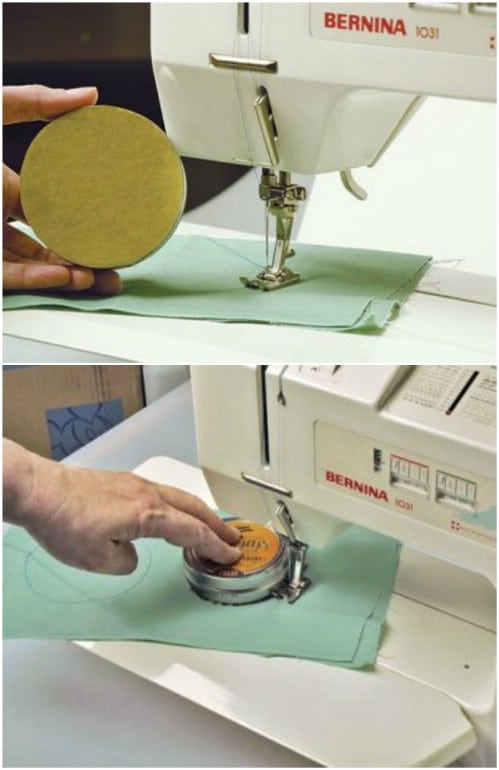
Sewing any shape besides straight down the line can be difficult. If you’ve ever tried to sew in a circular pattern, you know how hard it can be to get a great stitch and keep it circular. Did I mention that there’s a hack for that? You can use a round object and sand paper to create a template that lets you sew the circle and ensure that you have the perfect circular stitch every time.
Source and more info: threadsmagazine
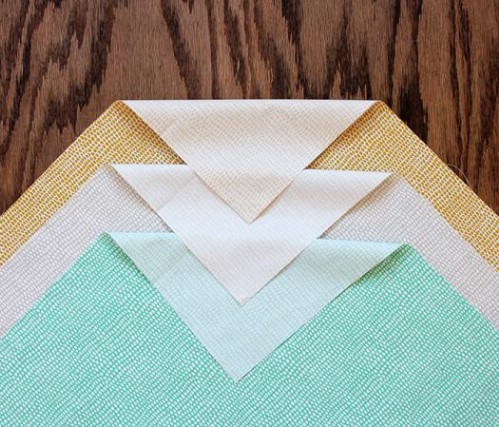
14. Easily Turn A Crisp Corner
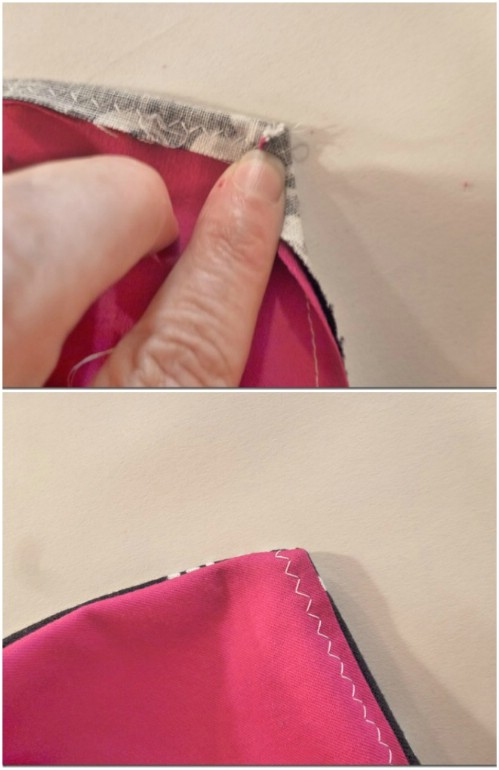
Turning a crisp corner and making it look good can be difficult. There is a way that you can make those corners perfectly straight and make your collars look amazing. This technique is practically fool-proof and is really easy to accomplish, even for beginners. The trick is in pressing and stitching the seam allowances.
Source and more info: onegirlcircus
15. How To Use A Bodkin
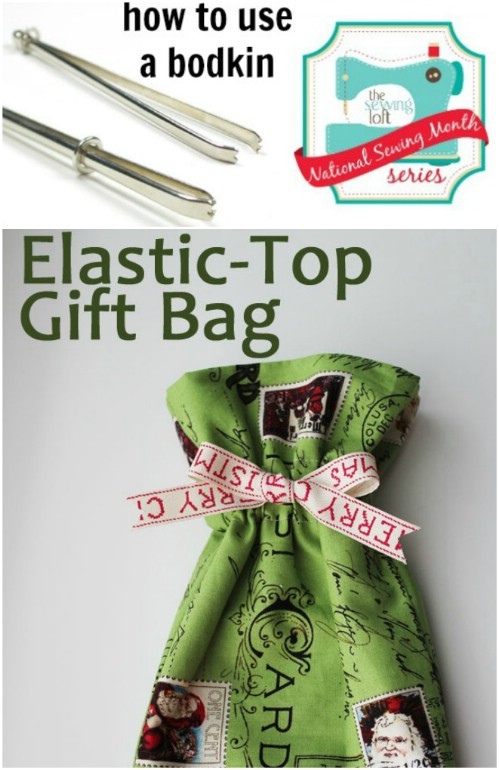
A bodkin is a tool that helps you to feed elastic through your fabric. If you’ve never used one, you’re really missing out on this easy sewing technique. There is an art to using one properly and learning how can make all those elastic sewing projects a breeze. If you don’t have a bodkin, they are relatively inexpensive, and once you get one, you’ll wonder why you never used one before!
Source and more info: thesewingloftblog
16. How To Replace A Bodkin
Again, a bodkin is your best friend when it comes to feeding elastic through sewed fabric. However, not everyone owns a bodkin or wants to purchase one. If you don’t have one, all is not lost. You can mimic the same effect by simply pinning a safety pin to your elastic and feeding it through with that. It may take a bit longer, but you’ll still get it done.
17. Wash Fabric Before Sewing
There are methods of pre-treating fabric that you should learn. Washing fabrics before you sew them can eliminate worries of shrinkage when they are washed afterward. There’s nothing worse than sewing yourself a new blouse only to find that it has shrunk and is too small once you’ve laundered it. Pre-treat your fabrics first, before you sew, to eliminate this problem.
Source and more info: craftsy
18. Learn How To Use Elastic Thread
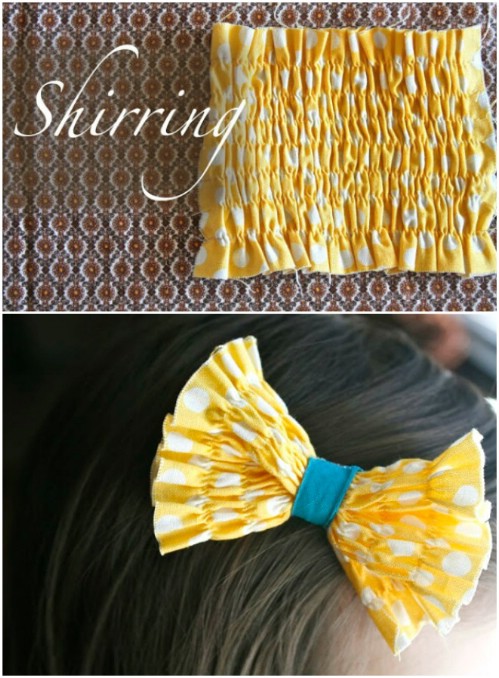
Making ruffles is actually easy when you’re using elastic thread, but there is a trick to using it. You have to remember when you cut your fabric that the thread will pull it in, so you’ll need to it larger initially, since it will be about half the size when you sew it. Remember also that the close your lines are when sewing, the more gathered your fabric will be.
Source and more info: rufflesandstuff
19. Pick Up Spare Pins And Needles
While you may have a pin cushion nearby, dropping those pesky pins can be frustrating at best. When you’re sewing, it’s important to be sure that you’ve picked up and put away all your pins – believe me when I say those things really hurt when you step on them. Keep a magnet handy when sewing and use it to ensure that you’ve gotten all your pins and needles when you’re finished.
20. Make Your Own Continuous Bias Tape
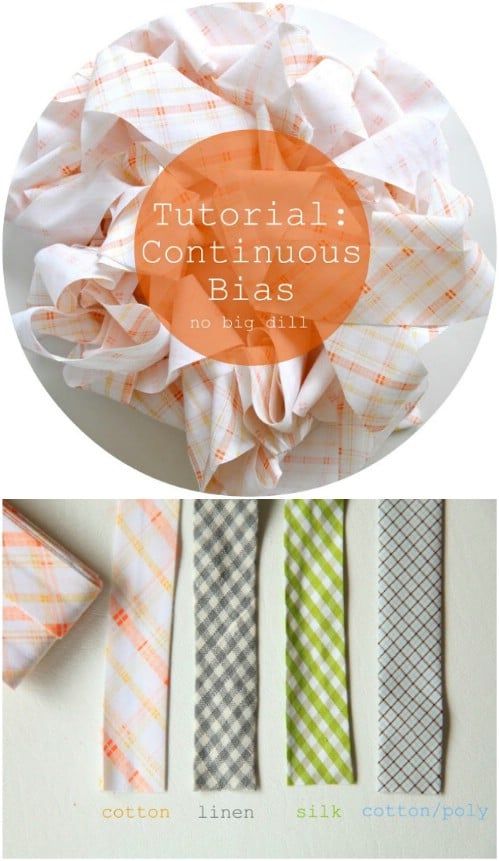
Bias tape is a great asset to sewers. You can use it to trim your quilts and placemats or use it when hemming to make the process much easier. Many people also use it for arm hole bindings and other tasks. Of course, if you’re using it a lot, it can get relatively expensive, particularly for those of you who quilt. Instead of shelling out dough for new tape for every project, you can easily learn to make your own tape with just a few materials and a few minutes of time.
Source and more info: nobigdill
21. Needle Threading Hack
If you’re having difficulty seeing those tiny needle holes, there’s a trick that can help. Whether you’re threading your machine or hand sewing, you can simply spray the tip of your thread with hairspray and it will stiffen it right up. Then it just slips right into the needle eye and you don’t have to squint to see it. Just push it right through and without those pesky fraying problems!
Source and more info: artofmanliness
22. Learning How To Use The Narrow Hemmer
If you sew with a machine, you may have a narrow hemmer presser foot. This can be a very handy device for getting those narrow hems perfect, although it can also be difficult to learn how to use the device properly. There’s often a lot of trial and error with hems, but this doesn’t have to be the case. There’s a great tutorial on learning how to use your narrow hemmer, and it will teach you to create those hems like a pro.
Source and more info: threadsmagazine
23. Keep Pins and Needles Sharp

Ever wondered how avid sewers keep their pins and needles sharp and shiny? No, they don’t run out and buy new ones with every project. You can use steel wool as a pin cushion to keep needles and pins sharp and working great for years. The next time you make a new pin cushion, just use steel wool as the stuffing. If you add rice, it will make your pin cushion much fuller and help to absorb any moisture from your pins.
Source and more info: findingpinsandneedles
24. Use Binder Clips To Hold Fabric Together
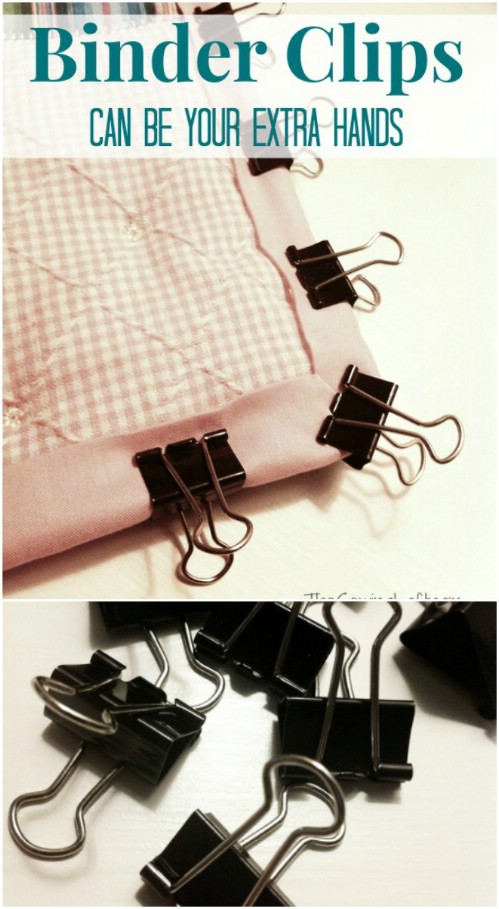
Thick fabrics like leather and denim can be difficult enough to sew, without worries of how you are going to hold it all together. I’ve actually broken pins trying to stick them through some heavier fabrics. Instead of pins, use small binder clips to hold those fabrics together. You can get these really cheap at the Dollar Store and they’re perfect for larger, bulkier fabrics.
Source and more info: thesewingloftblog
25. Keep Scissors Handy
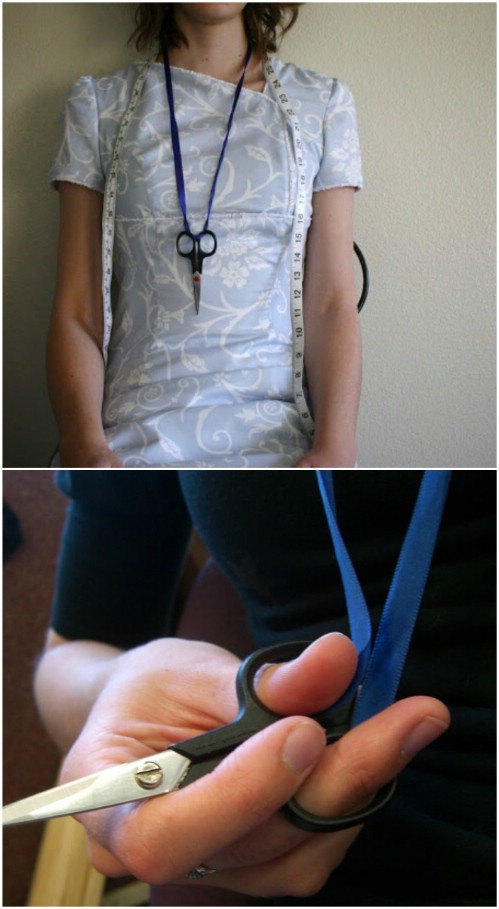
Have you ever been just sewing away and then suddenly couldn’t find your scissors? I do this all the time when I’m gift wrapping, and it can be very frustrating. Well, there’s a hack for that. You can create a great scissor necklace that holds those scissors right there on you, so you’ll always know where they are. The best part? You only need a long piece of ribbon to make it.
Source and more info: feathersflights
26. Easy Method For Taking In Dress Shirts
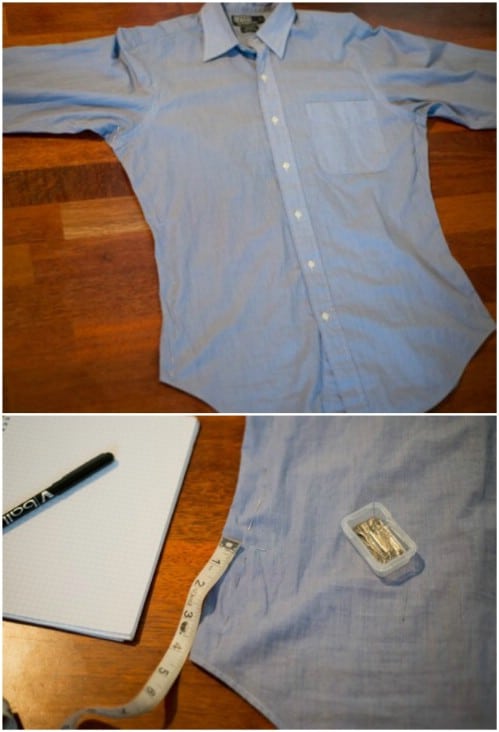
When it comes to certain clothing, like dress clothes, there’s only so much you can take them in before they just don’t look and fit right. You have to be very careful that you aren’t altering the design or the way the shirt is supposed to fit, even if you need to reduce the size a bit. You can take those shirts in, as long as you follow certain protocol to ensure that you don’t mess with the style.
Source and more info: indigorchid
27. Fake Hems
If you’re in a pinch for time and the hem on your favorite skirt has come out, you can create a fake hem with some bias tape. The tape will hold the material together perfectly until you can officially sew the hem back into place. In some cases, you may be able to do away with the sewing altogether and just use your fake bias tape hem instead.
28. Create A Good Smelling Pin Cushion
Have you ever been sitting at your sewing machine and thought, wow, I would love a nice smelling pin cushion? Well anyway, if you don’t have a pin cushion handy, and you need one in a pinch, a bar of soap works wonderfully. This is an especially good idea for when you’re on vacation and you just didn’t think to bring your pin cushion along with you.
29. Make Cleaning Your Machine Easier
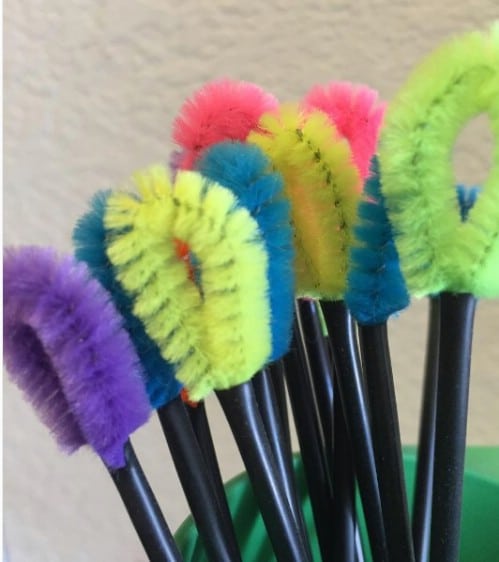
Cleaning your sewing machine is essential for many reasons. Obviously you don’t want whatever you are sewing to get all dusty and dirty. It’s also important to clean your machine regularly to keep it operating properly. Pipe cleaners cut and tucked into coffee stirrers are perfect for brushing debris from your machine. They’re also really cute and look like tiny toilet brushes.
30. Use Nuts And Washers As Pattern Weights
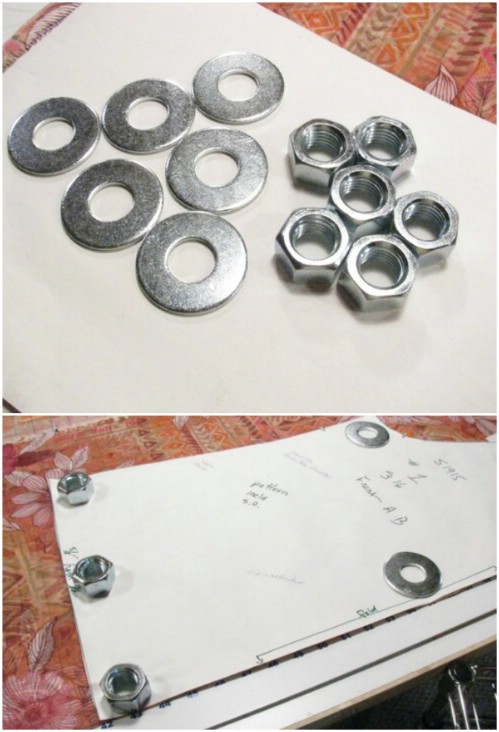
Why worry constantly about that pattern bunching up or otherwise not staying in place when you can fix it from the hubby’s toolbox? Washers and nuts are perfect for weighing down patterns so that you can easily pin and cut around them. Just strategically place them around the pattern and then trace and pin.
Source and more info: burdastyle
31. Prevent Fraying When Cutting
Fabric tends to fray whenever you cut it, some more than others. You can avoid this by using pinking shears to cut fabrics. Pinking shears are not at all expensive so if you don’t already have them, you can head out to the Dollar Store or Wal-Mart and pick them up. This helps with those fabrics that tend to fray terribly which can cause seams or hems to be shorter.
32. Hand Sewing Stitches Hack
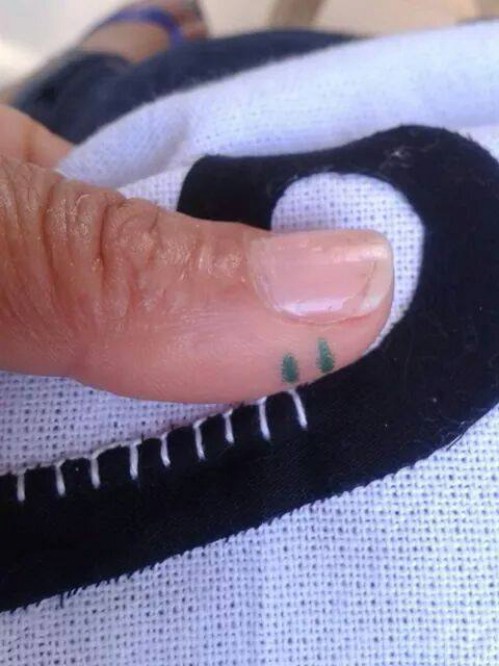
It can be so hard when you are hand sewing to ensure that your stitches are all even. Unless you’re just really gifted, you may notice that some of your stitches are much farther apart than others. You can remedy this by making a mark on your thumb with a sharpie. Just measure how far apart you need your stitches, and you can mark them easily as you sew.
Source and more info: boingboing
33. Create Easy Ruffles
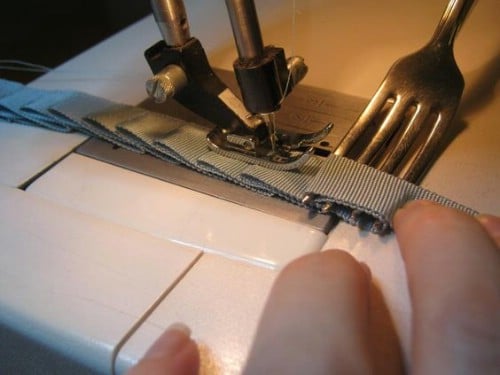
A fork can do so much when you’re creating ruffles. Honestly, this is one of the easiest ways to make ruffles I’ve ever seen. You just fold the material over the fork and sew the other side. It creates perfectly uniform pleats every time. Be careful that you don’t sew your fork, though!
34. Make Patterns Last Longer
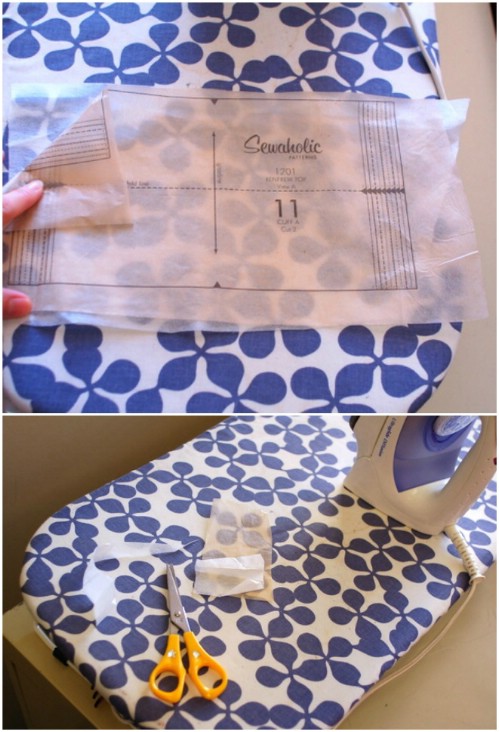
If you tend to use patterns more than once, and let’s face it, you totally should use them more than once, you may notice that the delicate paper tears easily. You can make those patterns last much longer by simply ironing interfacing onto the back of them after you’ve cut them out. This is a great way to save money if you tend to have to purchase patterns over and over again due to tearing.
Source and more info: sewaholic
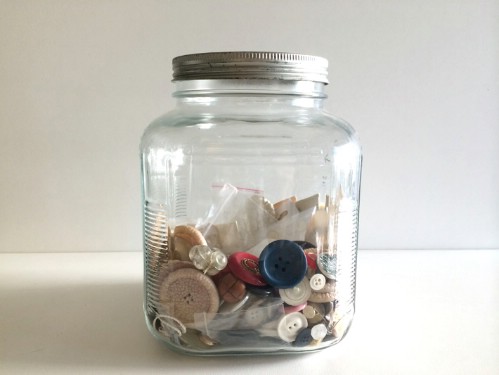
35. Keep Buttons In Place
Buttons tend to come lose and fall off at the most inconvenient times. You can keep them snugly in place by simply adding a thin layer of clear nail polish. The polish, when added to button tops, keeps the threads in place so they won’t unravel and cause your buttons to come lose.
36. Keep Trim Neatly In Place Before Use
If you sew a lot then you likely have tons of trim just cluttering up your sewing space. I’m all for organization, so I love this hack to keep trim in place. Just cut a piece of cardboard, from a cereal box or whatever you have on hand, and wrap the trim around it. Depending on how much you have, you may get all of your trim on one board. Then just pin it in place until you need it.
Source and more info: craftsy
37. Neatly Store Bobbins
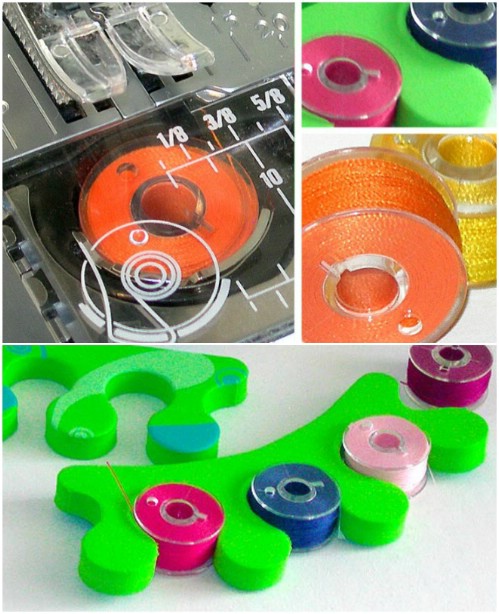
I have so many bobbins with so many different colors of thread. Organizing these things and keeping them neat can be difficult. They’re so small that you can easily lose them without even knowing it. You can use toe separators, which you can get at the Dollar Store for around a dollar or less, to keep bobbins separated and in place. This makes it much easier for you to find the color that you need.
Source and more info: sew4home
38. Use A Skirt Length Chart

It’s never a bad idea to have a standardized chart for sizing, especially for kids’ clothing. I found this amazing skirt length chart that tells you every possible size for skirts, from short to mid-calf, to long. It’s the same one that Children’s Place uses for sizing so if you’re planning to sew a skirt for your little girl or anyone’s little girl, this length chart is sure to come in handy. Print it off and keep it close to your machine.
Source and more info: crafterhoursblog
39. Sewing Buttons By Hand
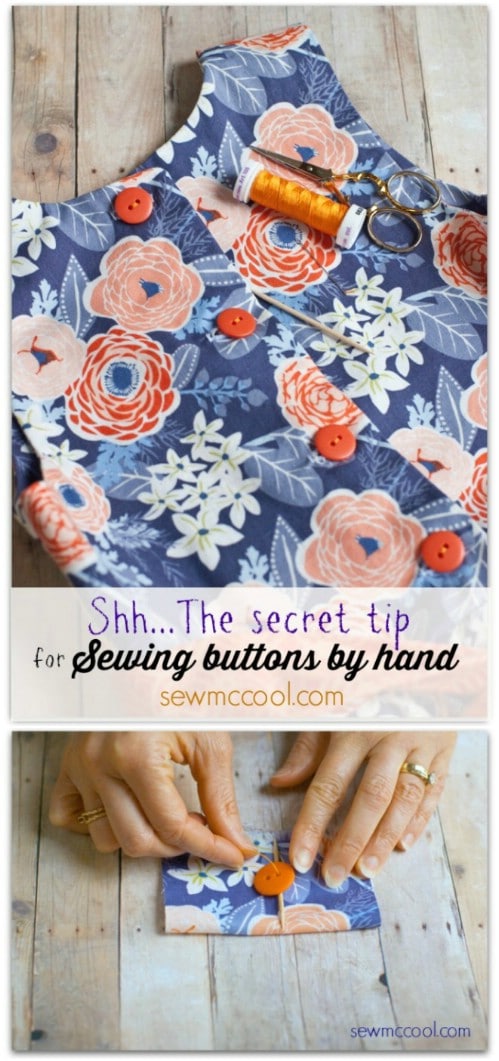
Let’s face it, no matter how good you are with a machine, there is going to come a time when you need to sew a button on by hand. While most of us mastered this art in high school, there is always something new to learn. If you’ve never sewn buttons by hand, you’ll find it easier than you thought. The secret is in getting the thread the right length and watching to ensure that it doesn’t pull through the fabric.
Source and more info: sewmccool
40. Use A Serger
A serger is great – you can sew to stitch and finish your seams at the same time. If you’ve never used a serger, you are really missing out, especially if you sew lots of clothing. The best thing about using a serger is you can sew to stitch the fabric and finish the seams at the same time, so you’re saving yourself a few hours of work when you use one.
Source and more info: positivelysplendid
41. Sew Buttons With A Machine
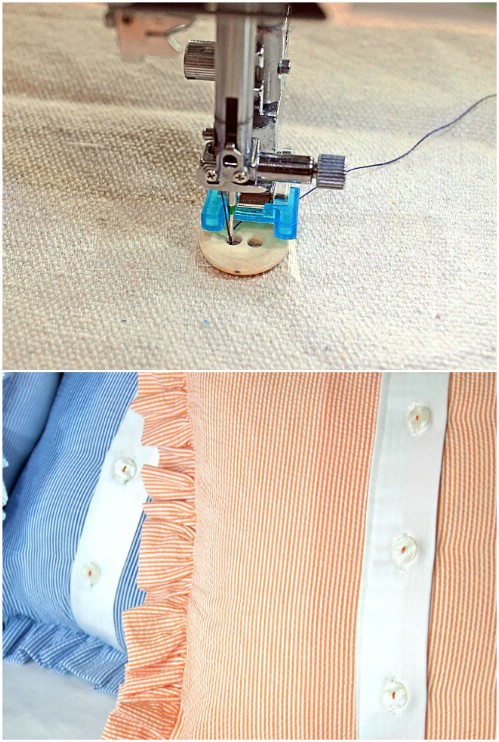
Okay, so you know how to sew buttons by hand, but if you have several buttons to attach, a machine might be a better choice. I didn’t even know you could sew buttons with a machine, but there’s a way to do it and it will save you loads of time. Learning this technique not only saves time but will help you to really get those buttons sewn in tight.
Source and more info: sew4home
42. Sew A Basic Zipper
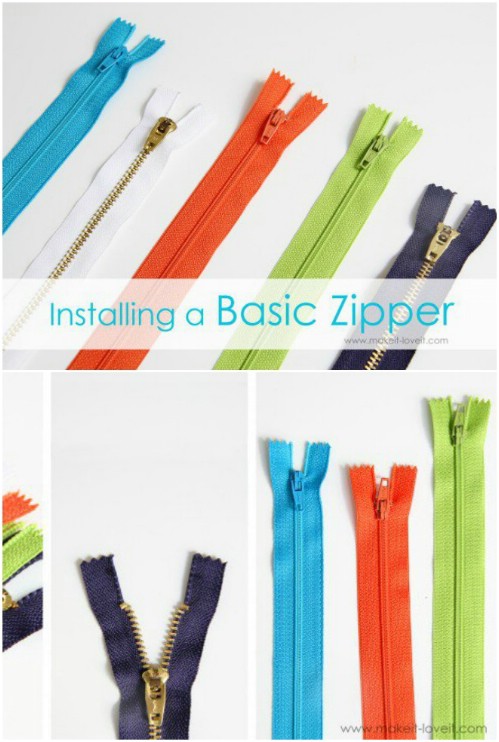
Is sewing in a zipper just the most difficult thing? I think so, but there is a great tip that will help you to get those zippers sewn in in about half the time that it typically takes. Learning to properly cut long zippers to make them fit and learning how to quickly and effectively sew them in is a trick that you’ll need, especially if you tend to sew a lot of projects. Taping the zipper onto your fabric and using a zipper presser foot are things that will make the process much easier.
Source and more info: makeit-loveit
43. Test Your Stitch Before You Sew
There’s nothing more frustrating when you’re sewing than having to stop mid-way through and rip out the stitches because you forgot that you set the stitch width and needle in the wrong position. You can save yourself loads of time if you just test those stitches before you go all out on a sewing project.
Source and more info: sew4home
44. Tame Bulky Fabrics
Certain materials are really bulky and often hard to sew. If you’ve ever tackled thick materials then you know the struggle. A good way to make your sewing easier is to use plastic bags. Those bags that you typically get from the grocery store make wonderful resources when you’re sewing thick materials. They help to guide the material smoothly through the machine and prevent it from getting stuck. This is great for faux fur, towels, Velcro, and a number of other fabrics.
Source and more info: threadsmagazine
45. Easy Seam Allowance Guide
Rubber bands can be placed around the base of your machine to act as seam allowance guides. Just move the rubber band where you need it when you begin sewing and follow it to ensure that all of your seams are uniform. This is a really cheap and easy way to ensure that seams stay true to their size and pattern.
46. Join Fabric Widths For Extra Wide Panels
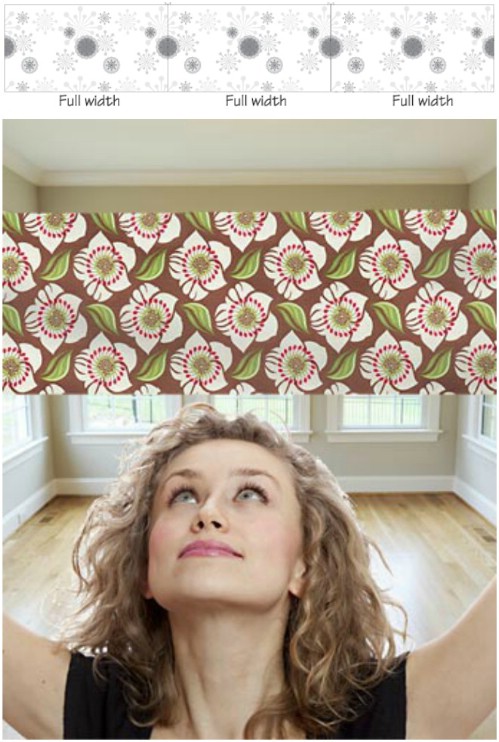
You probably know that you can just sew fabric together to make it larger. Maybe you didn’t know that when you join fabric widths, it’s best to add fabric to each side of your center piece so that it’s done symmetrically. This way, the fabric looks the same on both sides and doesn’t instantly draw attention to the fact that you had to lengthen it.
Source and more info: sew4home
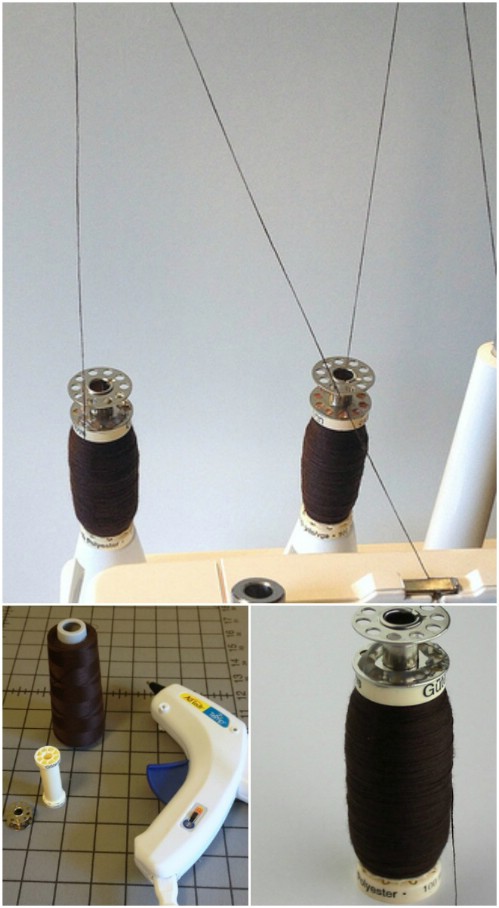
47. Keep Thread From Running Out
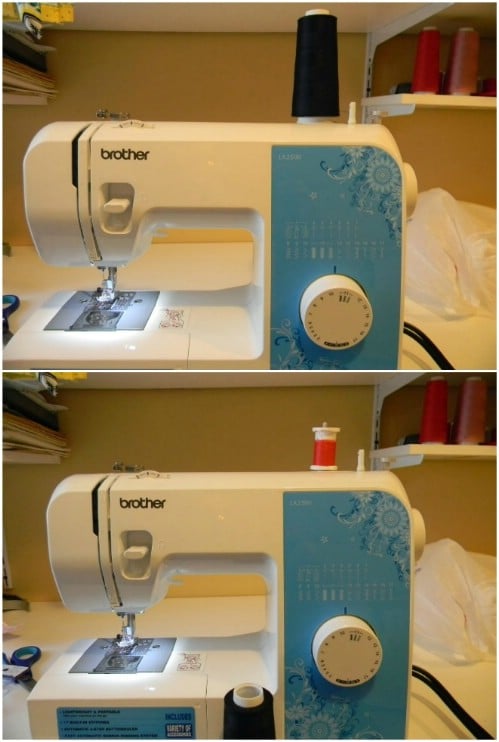
Serger thread is really cheap. You can get a giant spool for around $2. But, what if you don’t use a serger? You can still take advantage of the inexpensive thread and use it on your regular sewing machine. Just stick the large spool over a smaller spool. The small spool holds the larger one firmly in place and helps it to move as it should while you’re sewing. You can sew to your heart’s content without worries of running out and needing to add a new spool mid-way through your project.
Source and more info: boutiqueit
48. Keep Drawstrings In Place
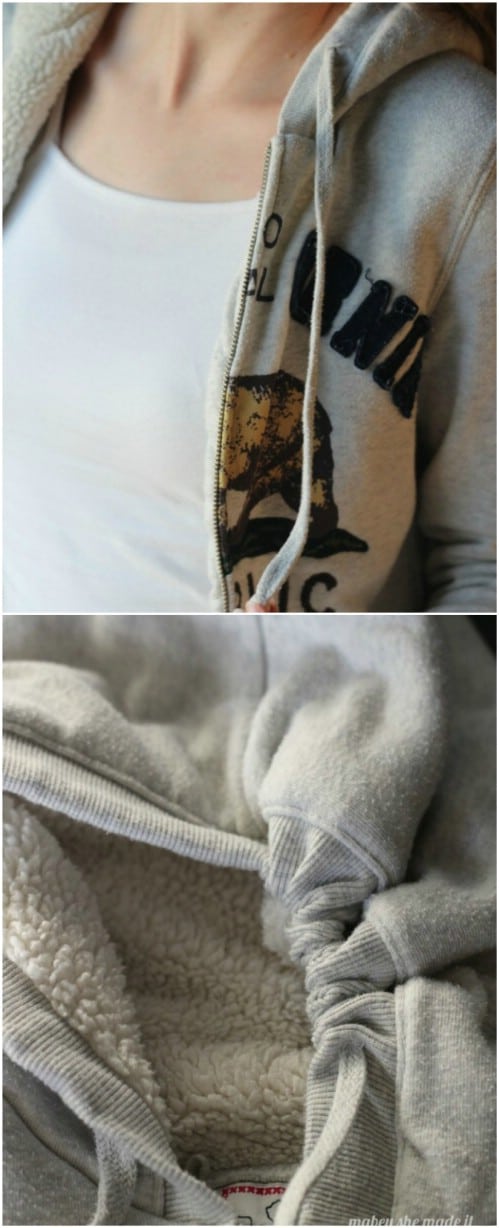
One of the worse things in the world is losing your drawstring. You know, when that pesky string pulls into your hoodie or coat and you just can’t find it to pull it out. There’s a great trick for keeping that drawstring firmly in place. You just have to sew a simple stitch at the mid-point for the string in the back of your pants or jacket. You can still use the drawstring to tighten, but it will stay where it’s supposed to be and the ends will always be even.
Source and more info: mabeyshemadeit
49. Upcycle Old Blankets
So, when you’re quilting, you know you have to buy loads of batting, right? Wrong. Instead of paying a small fortune for quilt batting, just use old blankets. This gives you a way to upcycle those torn or worn blankets, and it saves a bundle on batting. Just use the blankets just as you would batting, and you may find your quilts a bit less stiff when they’re finished, too.
50. Don’t Sew Over Pins

When you’re sewing, you just want to rip through that fabric and keep going. However, sewing over pins can be dangerous. It may be fast, but you risk hitting the pin with your sewing machine needle, which can break the needle and damage your machine. Instead, insert pins horizontally with the top facing the inside of the machine. Then stop just a fraction of an inch before you reach the pin, pull it out, and place it in a lid that you’ve got right there on top of the machine.
Source and more info: sew4home
51. Cut Slippery Fabric Easily
When you’re cutting slippery or slick fabric for a project, like silk or something similarly difficult to work with, place a layer of muslin under the fabric before you cut it. Pin down the layers of fabric and muslin and then cut. The muslin keeps the fabric from slipping which will help you to avoid cutting the wrong size or otherwise messing up your fabric.
52. Hem Distressed Jeans
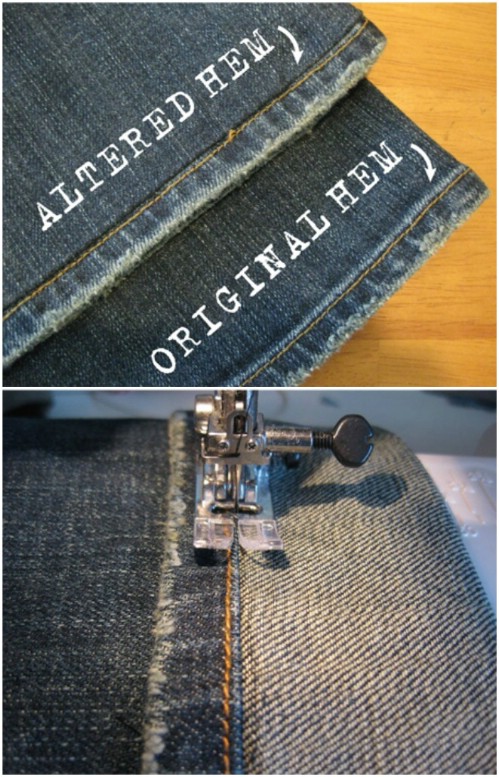
It can be difficult to find jeans in the right length, particularly if you aren’t supermodel height. If you’re finding it hard to find distressed jeans that fit right, you can actually alter the hemline without messing up the jeans. You just fold them over inside and leave the original hemline. This is much easier than it sounds and leaves your jeans looking like they were altered by a professional.
Source and more info: justsomethingimade
53. Cut Burlap Perfectly Straight
You’ve likely noticed how much I love burlap. You can really decorate so many things in a rustic way with this amazing material. However, it can be difficult to get the perfect cut. An easy way to cut straight lines in burlap is to simply pull out one strand before you cut. The strand will show you where you need to cut to get a perfect line. You just cut along the gap.
54. Use Soap Instead Of Chalk
You know you hate having to get chalk out of your fabric once you’ve cut out a pattern. An easier way is to substitute soap. When you’re tracing lines on fabric, use soap – which by the way you could easily melt down and form into a pen shape. When you use soap, it washes out easily and there are no worries of chalk lines on your finished product.
55. Use Mini Clothespins For Sewing Bindings
When sewing bindings and piping, mini clothespins can make your life much easier than pins. You can get these clothespins at the Dollar Store for around a dollar or so for several. Instead of having to negotiate all those pins, you just unclip the clothespins and they help to keep your layers perfectly lined without worries of repining.
Source and more info: positivelysplendid
56. Press Fabric Between Buttons
Your iron may be your best friend when it comes to pressing fabrics for sewing, but not so much when it comes to pressing those small spaces between buttons and other embellishments. You can actually use a hair straightener to easily press those areas without worries of hitting your buttons or melting decorations on your project.
57. Sew Knit Fabric On Your Machine

Sewing knit fabric can be difficult to say the least when you’re using a sewing machine. But who wants to do all that sewing by hand? Well, you don’t have to. There’s a trick to sewing knit fabrics on your machine that will definitely save you time and effort. You have to remember the stretch when working with knit fabrics, and there’s a great guide that can help you to get the perfect stitch no matter how much stretch you have.
Source and more info: andreasnotebook
58. Easy Printing Fabric
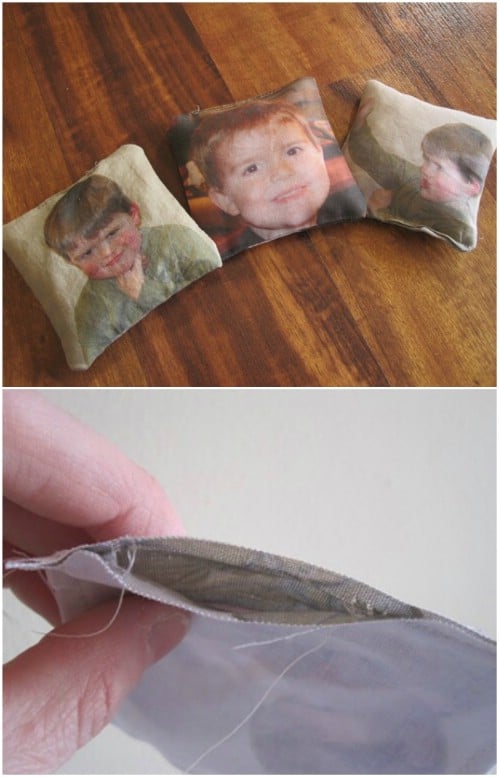
You may think that you have to purchase expensive fabric to print designs or photos. You don’t. An easy and much less expensive way is to just soak cotton fabrics in a mixture of washing soda, Alum, fabric softener, and hot water. This gives you vibrant colors that will not bleed and saves you a bundle when it comes to photo print designs.
Source and more info: theidearoom
59. Keep Your Iron Clean

Keeping your equipment clean and well-maintained is essential for any DIY project. This includes your iron when it comes to sewing. You can keep your iron looking and working like new with this simple trick. Just mix salt and vinegar and heat on the stove. This solution easily wipes away any dirt and grime that may be on your iron and keeps it from dirtying up your fabrics.
Source and more info: littlethings
60. Organize Your Embroidery Floss
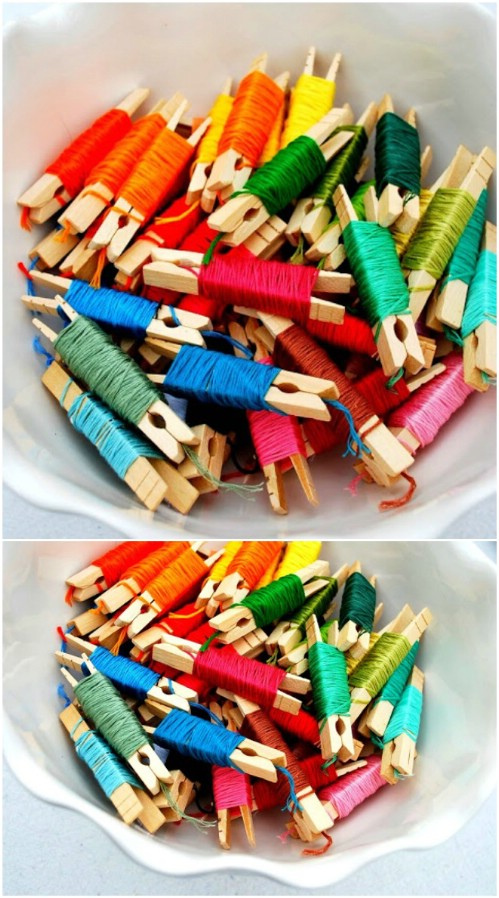
Embroidery floss can easily be kept organized with just a few minutes and some really inexpensive supplies. Organization is essential when it comes to sewing and other crafts, particularly if you tend to do more than one project at a time. Clothespins work perfectly for keeping threads organized and they’re really cheap – you can get a bag of 50 or so at the Dollar Store for just a couple of dollars.
Source and more info: heatherjslife
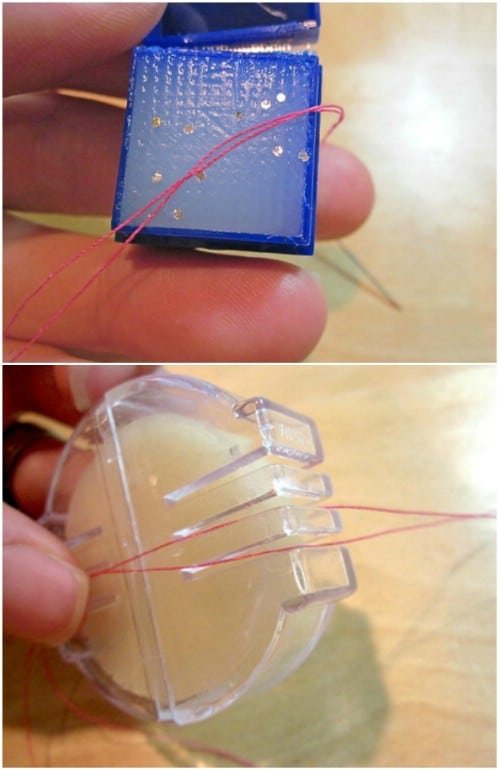
61. Create A Mini Sewing Box
An old matchbox works perfectly for creating an on the go sewing case. Just add your pins, needles ,and thread in the box and drop it in your purse or put it in the glove compartment of your car. This is a great way to avoid those mishaps like tears or missing buttons when you’re on the go. You can wrap thread around small cardboard pieces and add a few different colors so that you’re prepared for any sewing emergency.
62. Bobby Pins Hold Pleats In Place
When you’re ironing, you want to be sure that you are not ironing out your pleats. You can avoid this by using bobby pins to hold those pleats in place. Then just remove the bobby pins when you’re finished and you have a perfectly ironed piece of clothing. Bobby pins are really cheap – you can get 50 at the Dollar Store for around a dollar or so.
63. Keep A Mug Next To The Machine
Keep an empty coffee mug next to your sewing machine to make using large spools easier. If you’re using a spool that’s too big for your machine, you can simply place the spool in the mug, which you position directly under the spool pin. This allows you to keep using that thread spool without having to transfer it onto a smaller spool.
64. Sew With Decorative Thread
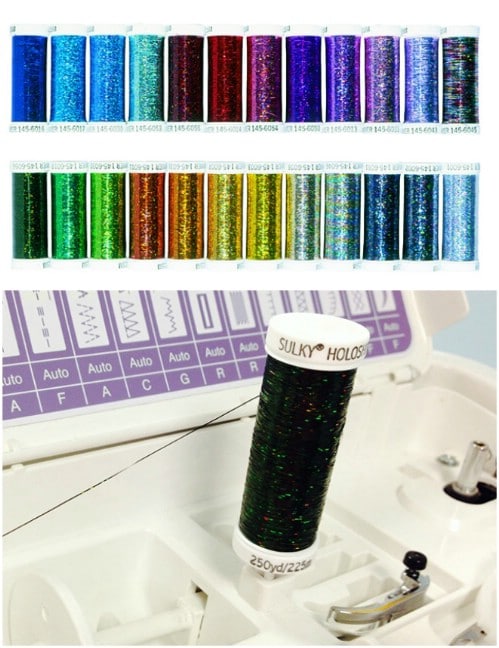
Metallic thread is beautiful but it can be very difficult to use. If you are sewing with decorative thread, you can use two spools (one decorative and one regular) threaded through the machine and around the needle. Do this the same way that you normally would, only with two pieces and thread both pieces through the needle eye. The regular thread will help to support the decorative thread and push it along.
Source and more info: sulky
65. Keep A Tape Measure Handy
Keep a tape measure attached to the edge of your sewing table so that you always have the proper measurements. You can easily attach a tape measure with Velcro or a similar solution. This ensures that your measurements are always exact and that you never misplace your ruler.
66. Learn How To Find Your Grain
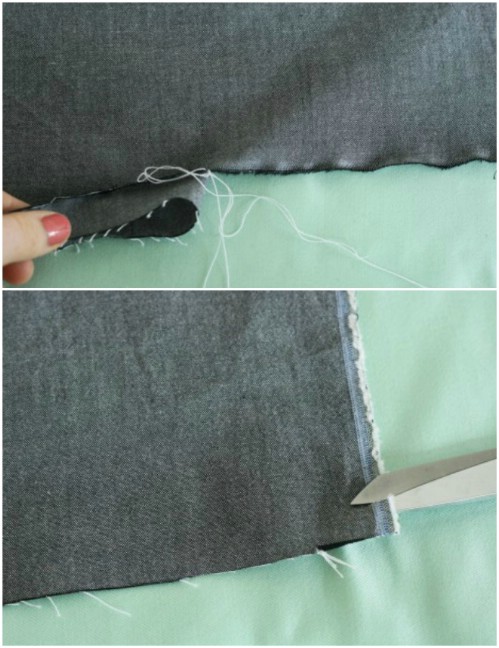
Finding your grain can often be the most difficult part of beginning a project. However, if you clip into the selvage just a bit and pull on a loose thread, you can easily find the grain. The loose thread will tug on the fabric and you can pull it out gently. This line that is left is your cross-grain and the cross-grain runs perpendicular to the grain line. Once you fold the fabric in half, your lines should match on both sides.
Source and more info: colettehq
67. Keep Extra Buttons Handy
You know when you buy certain clothing and there are extra buttons sewn inside? This is for when you lose a button. You can do this yourself and ensure that you are never without replacement buttons. When you sew clothing, just add an extra button or two to the inside so that if you lose one, you’ll always have a replacement that perfectly matches the other buttons.
68. Use Sponges When Quilting
Quilting is wonderful but sewing quilts can be difficult. You can help to move your fabrics along when you’re quilting by using sponges to move the fabric. Just hold a small kitchen sponge – a 3 by 5 inch sponge will do – in each hand when you are sewing to help guide the material through the machine.
69. Sew Without A Machine
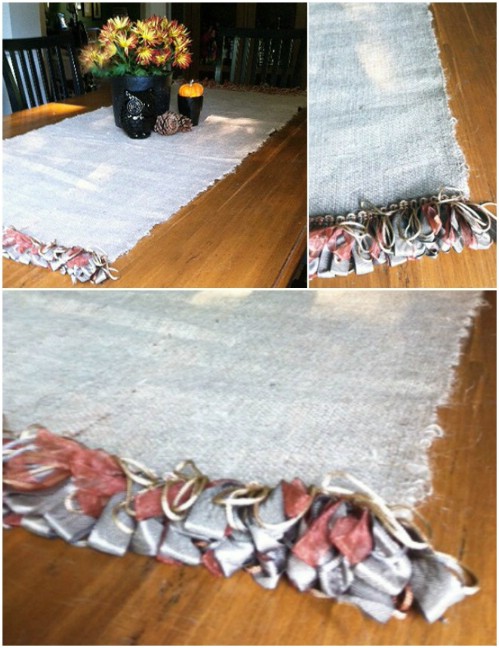
You may often want to sew without using your machine and without worrying with hand sewing. While a glue gun can be a messy way to sew, it is also very effective. If you’re just looking at making something simple, like a burlap table runner for instance, you can use a hot glue gun to create the seams instead of getting out the machine, and this is a great fast fix for hems that have come loose, when you just don’t have time to sew them back into place.
Source and more info: grecodesigncompany
70. Cut Out Patterns Easily
If you’re having trouble keeping patterns in place while cutting and you don’t want to bother with weights, you can use freezer paper. Just press freezer paper to your pattern which will cause it to stick to the pattern pieces. Now you can easily cut out those pieces without worries of weighting them down and without cutting into the pattern itself.
71. Easily Turn Think Projects Inside Out
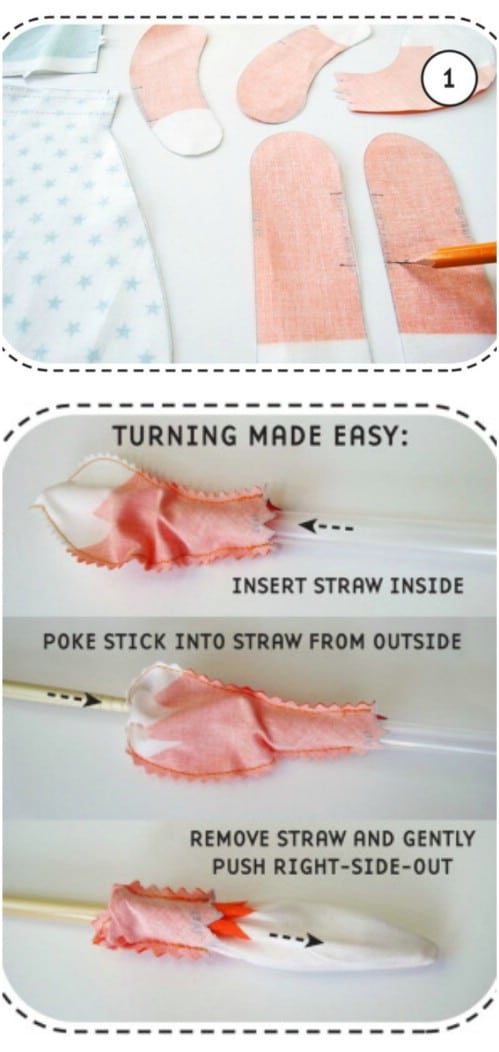
This trick is great if you are making sewn animals or other small items. If you have a tail or a bag that needs to be sewn and then turned, you can use a straw and a skewer or chopstick to get the job done easily. You just stick the straw on one end and then use the skewer or chopstick to push the fabric through, turning it inside out or vice-versa.
Source and more info: happysewlucky
72. Know Which Side To Sew
This may seem like a no-brainer, but it can be really difficult sometimes to know which side of the fabric is the right side. Normally, the right side is where the pattern is shown best, but if the pattern is all the way through or there is no pattern, you want to know how to tell which side you should show. You want to keep the fabric consistent throughout your project.
Source and more info: howtosew
73. Learn Threads
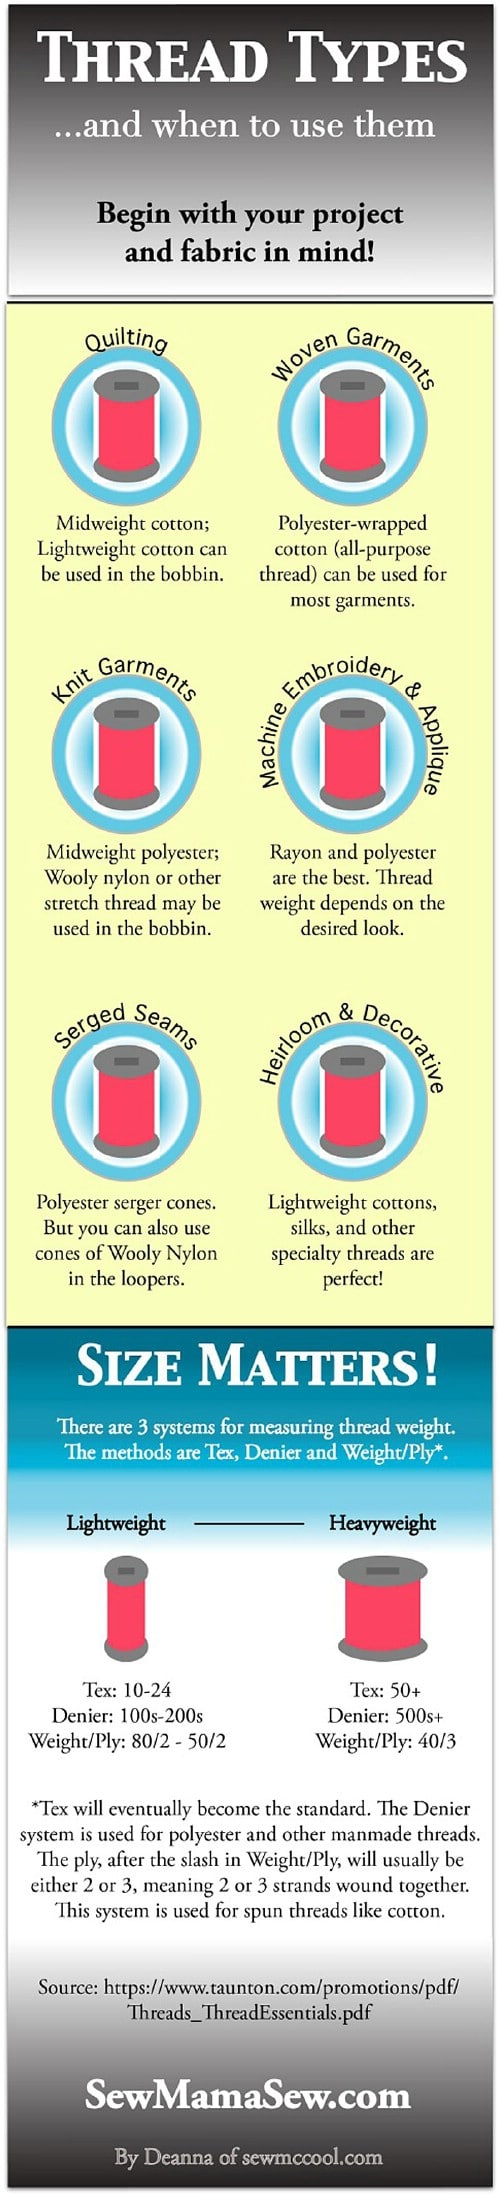
One of the best ways to cut down on sewing time is to know which thread to use before beginning. If you use the wrong thread, you run the risk of thread breaking or having to undo stitches and redo them again, which could add hours to your project time. Know which threads are best for which materials to ensure a quick and easy project every time.
Source and more info: sewmodernbags
74. Add Measuring To Your Cutting Table
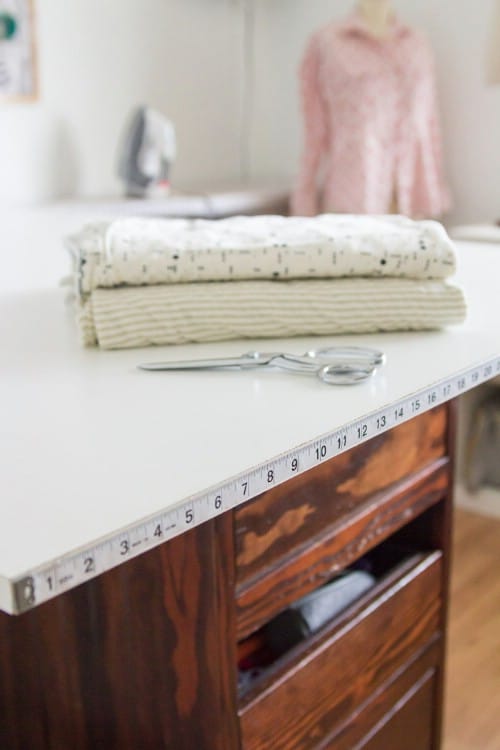
If you’ve ever visited a sewing shop, you have likely seen their cutting table for fabric, which comes complete with a measuring guide on the side. You can easily recreate this by simply attaching a measuring tape to one side of your cutting table. This ensures that you cut the perfect amount of fabric every time.
Source and more info: mellysews
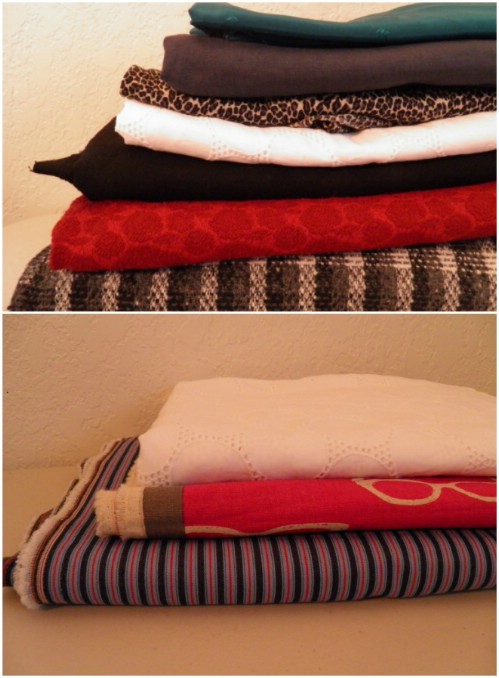
75. Easily Store Extra Fabric
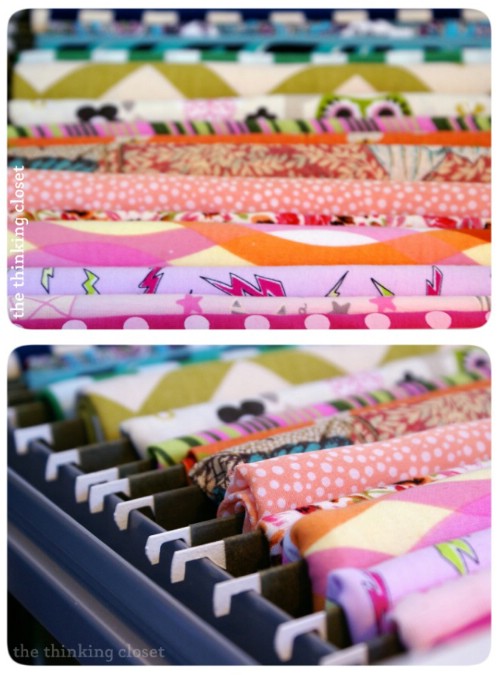
If you’re an avid sewer, then you probably have a lot of fabrics in store for future projects. An easy way to keep these organized is to put them in a file cabinet. File them as if you would papers by lining them up across file separators. This way you can instantly see which fabrics you need and save time looking for them. Plus, this organization helps to keep fabrics from wrinkling.
Source and more info: thinkingcloset
76. Keep Thread Organized

Saving time during any project is a must for me. I love this thread organizer that you can make from an old picture frame and some dowel rods. This keeps all your thread together, and ensures that you can always find the color that you need. You could create another one that holds your bobbins as well, and hang them in your sewing room as art.
Source and more info: greylustergirl
77. Neatly Store Buttons
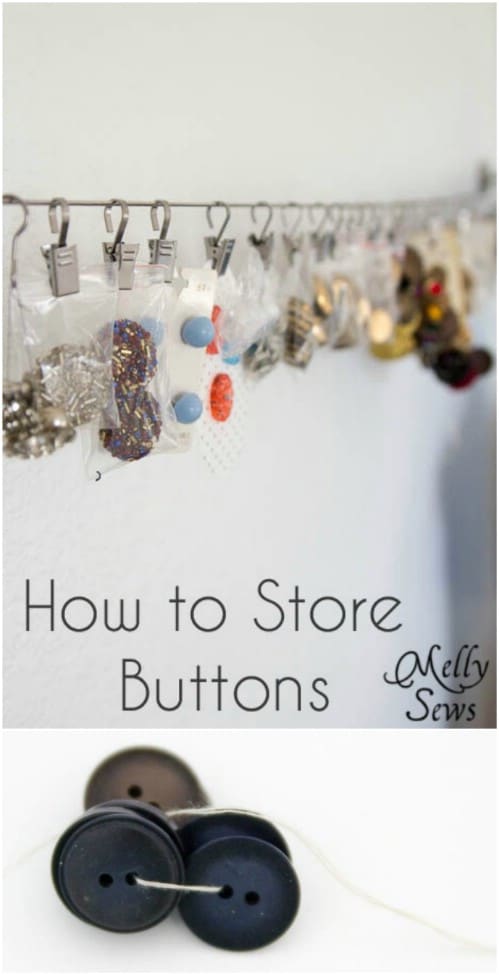
Save additional time by keeping your buttons neatly stored, so you can always find the ones you need. A simple wire run across a section of the wall and some small plastic bags are perfect for keeping buttons organized. The bags make it easy to find the buttons you need, and you can hang them across the wire with mini clips.
Source and more info: mellysews
78. Use A Pegboard

Here’s another great organization tip – a pegboard. You know that you have to be organized in order to save time on your sewing projects. Organization is the number one hack of any DIY project, after all. A pegboard in the sewing room gives you loads of space for organizing sewing essentials and keeping them where you can easily find them. Plus, pegboards are really inexpensive and you can customize your storage however you need it.
Source and more info: sewcaroline
79. Save When Cleaning Your Machine
Canned air is a wonderful thing and can really help you to get that sewing machine cleaned out and remove all the dusts and fabric or thread particles. Of course, canned air isn’t free – which is odd since it’s air, right? You can however, avoid the cost of canned air and simply use a bicycle pump to clean out your machine. These cost around $5 and can be used continuously, so there’s no worry of running out or spending extra money to buy more air.
80. Learn How to Sew in an Invisible Zipper
If you have ever wondered how to use the universal invisible zipper foot on your sewing machine or you just want an easy tutorial to learn how to sew in an invisible zipper, this is a great one. Invisible zippers can be hard but this tutorial shows you an easy way to do it. .
There are only a few steps involved and you can learn step by step how to prepare your garment for the zipper and put in that zipper, ensuring that it doesn’t show from the outside. This is a great tutorial for those of you who may want to beef up your sewing skills. Zippers on their own can be difficult but this project is about as easy as sewing projects come.
Learn how to put in that zipper and how to use your zipper foot. Who knows what you may want to make once you get the hang of it Lovely video by ProfessorPincushion.
source : https://www.diyncrafts.com/

Good and amazing website
J’aimeAimé par 2 personnes
Woow
J’aimeAimé par 3 personnes
Woooow very good👍
J’aimeAimé par 2 personnes